
How to get the most out of your iPhone camera
Do you remember the Motorola Razr phone? Those were all the rage back in 2004! When my husband got one, I remember saying "Why in the world would anyone need a camera on their phone?!"
Well.... needless to say, technology has changed tremendously in the last 12 years and now everyone carries a tiny computer in their purse or back pocket. And goodness do we (myself included) use our camera phones!! So for all my snap-happy friends, here are
8 tips to help you get the most out of your iPhone camera:

1) Quick draw
Dogs and children can move fast, and that special moment might be over by the time you enter your passcode and tap through the apps to find the camera. Avoid missing "the shot" by knowing how to open your camera app fast:
From a locked phone, simply tap the home button and swipe right (iOS 10) OR tap camera icon on lower right corner and swipe up (earlier iOS versions).
From an unlocked phone, swipe up and tap the camera icon.
2) Reduce blur
Did you know you can use the volume up button as your shutter release button? For horizontal pictures, this allows you to hold your iPhone like a traditional camera with the button on top. Using two hands to hold your phone = steadier grip and less blurry pictures!
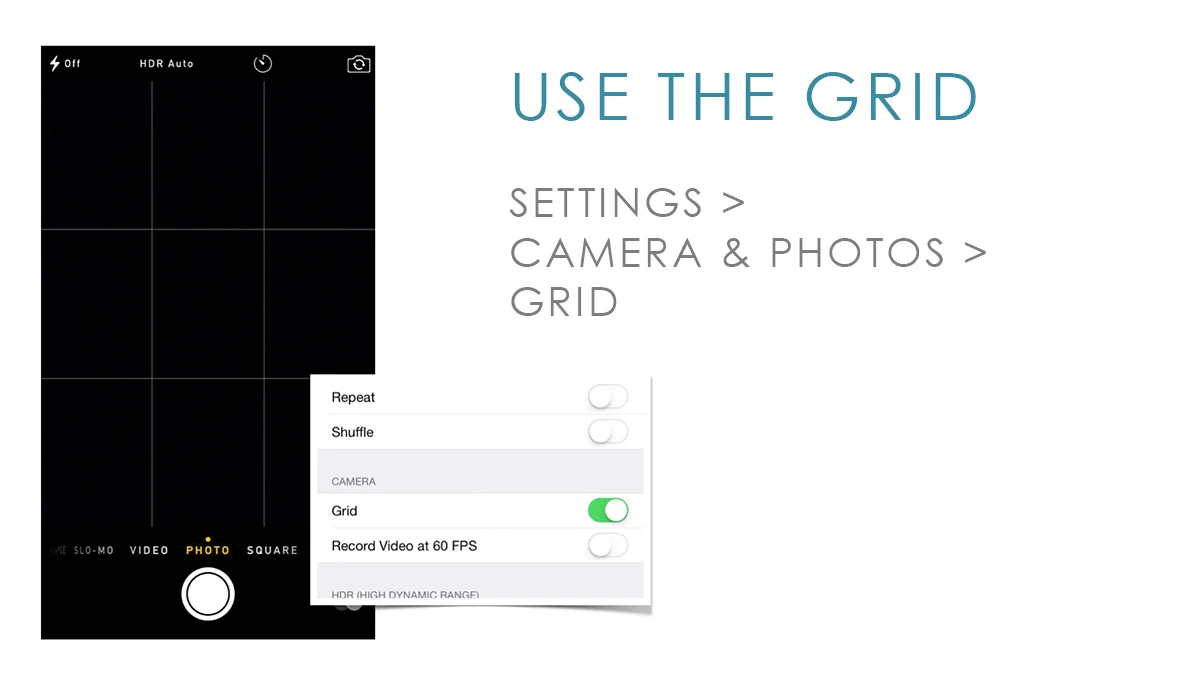
3) Use the grid
Turn on the camera grid lines in Settings > Photos & Camera > Grid. Why? This will help you apply the rule of thirds, which is a popular photography technique where you imagine the image being divided into nine parts (like a tic-tac-toe board) and place the main subject on one of the four intersection points. Photographs that follow the rule of thirds are typically more artistic and interesting to our eyes.
4) Zoom with your feet
Avoid using the zoom feature on your iPhone camera, as it results in compromised quality making the image grainy or pixelated. Instead, simply walk closer to your subject!
5) Turn off your auto flash
The bright flash from your camera can result in harsh, unflattering light on your subject, so I recommend turning the automatic flash off. Simply tap the lightning bolt icon in the upper left corner of your camera screen and then tap "off."
6) Adjust brightness
Your camera does not always see and adjust the lighting the same way your eyes can. One example is trying to photograph a darker subject in front of a bright background. But there's an easy way for you to control how bright or dark your image is:
Open your camera and compose your shot. Tap and hold on the screen where you want to focus. A yellow box will appear with a yellow slider on the right. Swipe up to make it brighter, or swipe down to make it darker. When you're happy with how it looks, take the shot.

7) Burst into action
For dogs or children on the move, try burst mode. Simply hold down the shutter button to take multiple shots in succession (up to 10 frames per second). Then you can choose the best frame and delete the rest. This technique works better when there is plenty of light.
8) The finishing touches
Most professional photographers will agree that taking the photograph is just part of the equation, and that the image is not complete until it has been edited. There are many editing apps available, but my favorites are Snapseed, Camera+, and PicTapGo.
I hope these tips help you document the everyday moments in your life. And I'll go ahead and admit that I was wrong... Motorola was on to something with the Razr, and I love having a convenient camera with me nearly all the time! Did you have a Razr? Or are you skeptical of new technology?


